

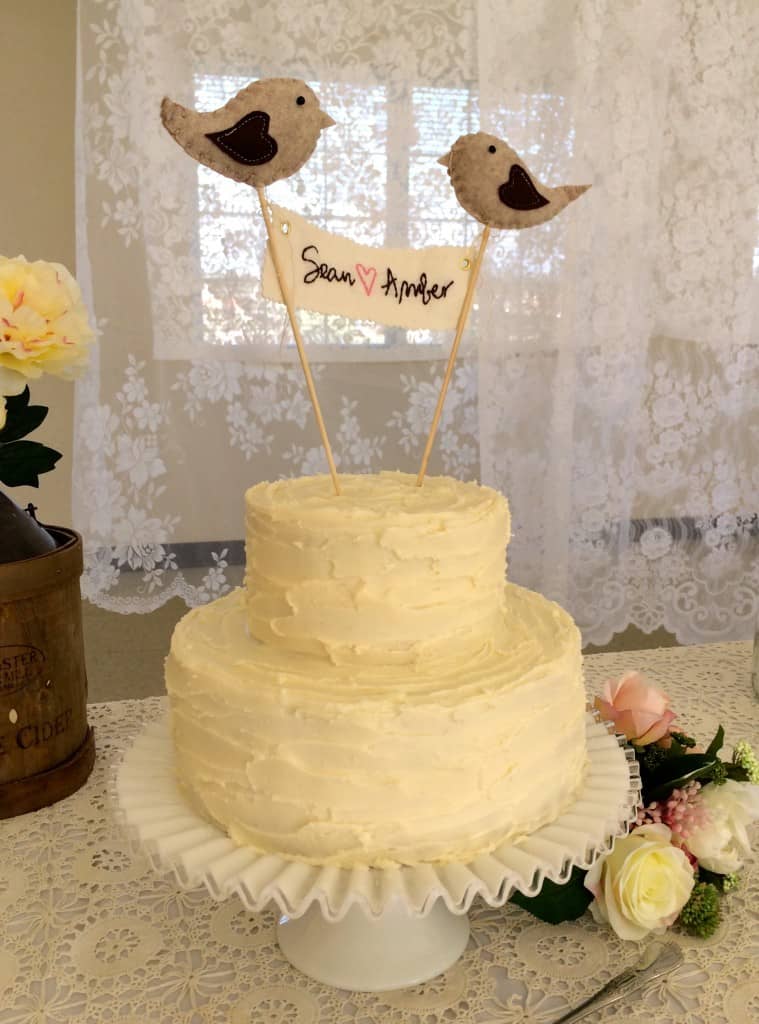
Easy Cake Decorating Ideas (No Piping Bag Needed!)
These easy cake decorating ideas will give you impressive results without using a piping bag! The easiest cake decorating tips, ever!
I had promised to do this cake decorating tutorial a while ago, however like most things, it took quite a bit longer than I expected, but I hope it was worth the wait. And Murphy’s Law: I baked all these cakes during the hottest day of the year!
As an Amazon Associate I earn from qualifying purchases.
You may already know that I’m getting ready to travel to Scotland to be a judge in the Scottish Baking Awards Competition on September 28th. I can’t wait to see and taste what all the incredible Scottish bakers have to offer this year!
In order to enter a cake/baking contest, one needs to have a certain level of skill, technique, and experience, not to mention, talent. However, none of those are necessary in order to create an impressive cake, which is the reason I want to share this post. If you follow my three simple steps, you will be able to garner compliments and comments such the wide-eyed, “You made that?” with these super easy cake decorating ideas.
I have baked so many cakes, I could never try to put a number on just how many, yet I hardly ever decorate two in the exact same style. I have never taken a cake decorating class or course, although I was given some instruction in how to do basic piping, from my mother who had a business decorating and delivering wedding cakes (including my own, which we made together).
The point of this cake decorating tutorial is to show you that you can make a basic cake look impressive with no cake decorating experience or skill whatsoever! And without a piping bag or tips–t’s true.
You’ll see that with these easy cake decorating ideas that once you have some basic knowledge, tips and tricks (which I will show you below) to decorate and present a cake, you will be able to incorporate your own ideas. You’ll then realize that the possibilities are endless, and all without filling a piping bag!
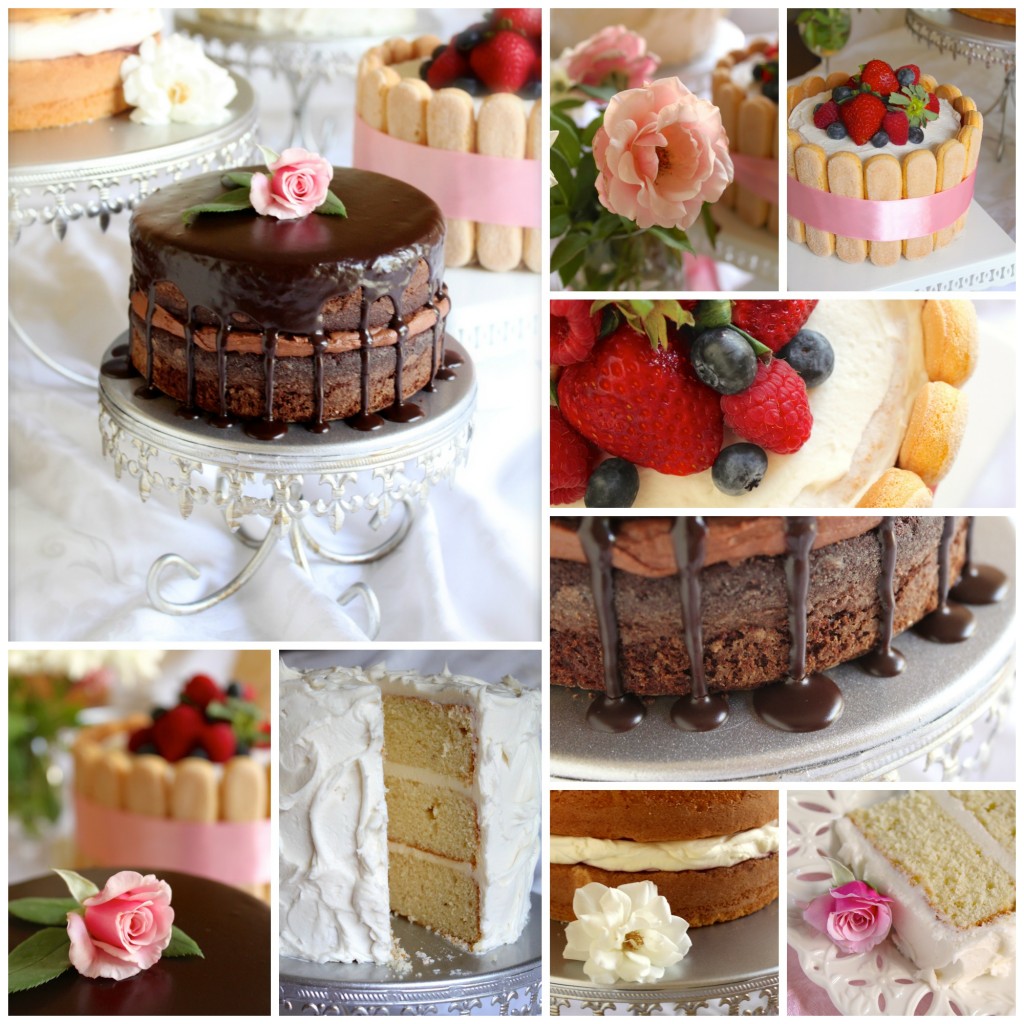
Easy Cake Decorating Ideas
by Christina Conte
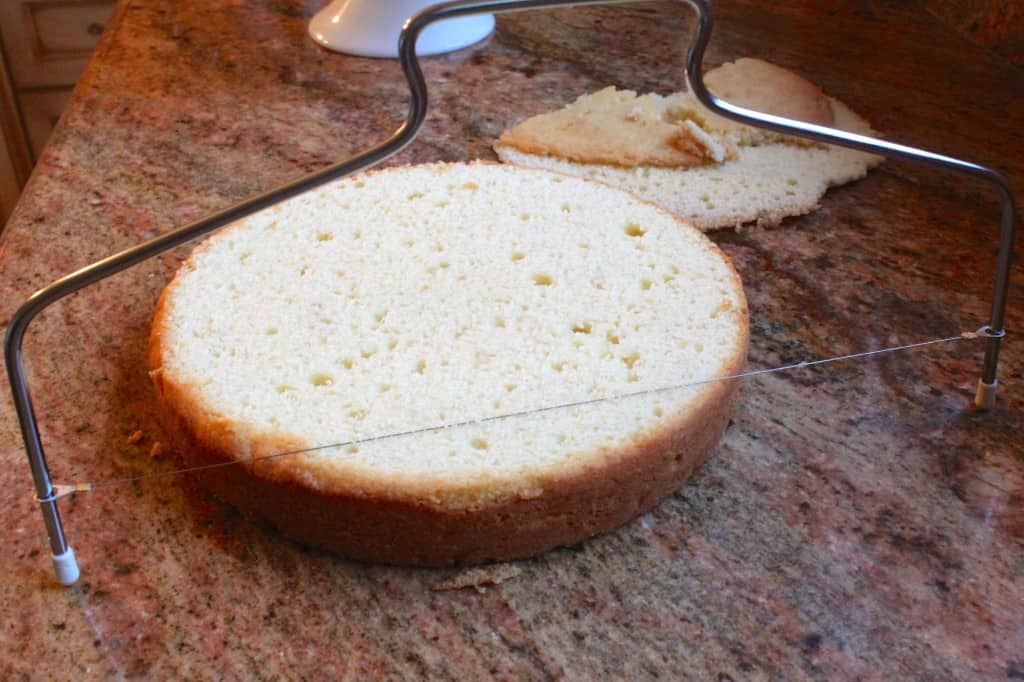
LEVEL YOUR LAYERS
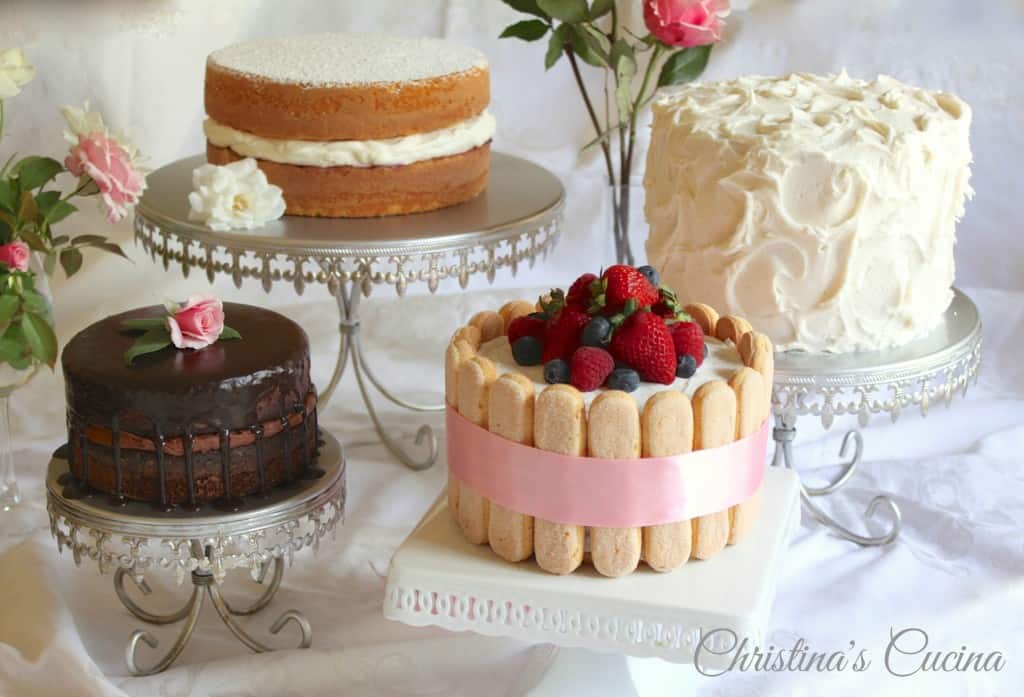
STEP 1. The most important step in making a cake look more impressive and professional, is to make the layers level. You’ll never see a domed, uneven cake on display in a bakery or baking competition, right?
The simplest way to do this is to use this wonderful tool, cake leveler/slicer which a child can use with perfect results. Simply adjust the wire to the depth needed to make a level cake layer and saw away with the feet placed on the counter. Remove the top and you have a perfect layer!
Now, if you truly don’t want to spend $5 (I would advise that you splurge, btw), then you can use a large, serrated knife or even dental floss, but I know I can never keep those perfectly level.
STEP 2. Next is to choose a frosting or filling for in between the layers, and the top and sides (if you choose to do the top and sides). Here are a few options:
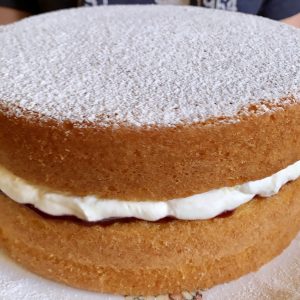
Jam and Whipped Cream
If you choose to use jam and whipped cream, put the jam on the bottom layer and spread the cream on top of the jam, then carefully place the second layer on top.
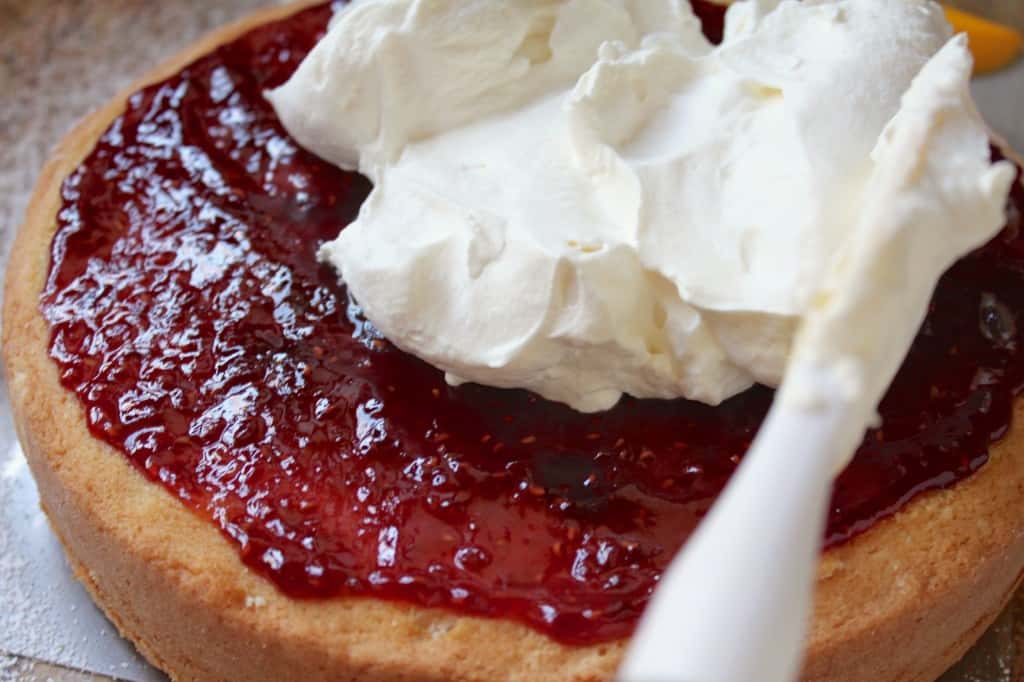
I use a cake lifter to move the cake from the counter to the serving plate, it works really well.

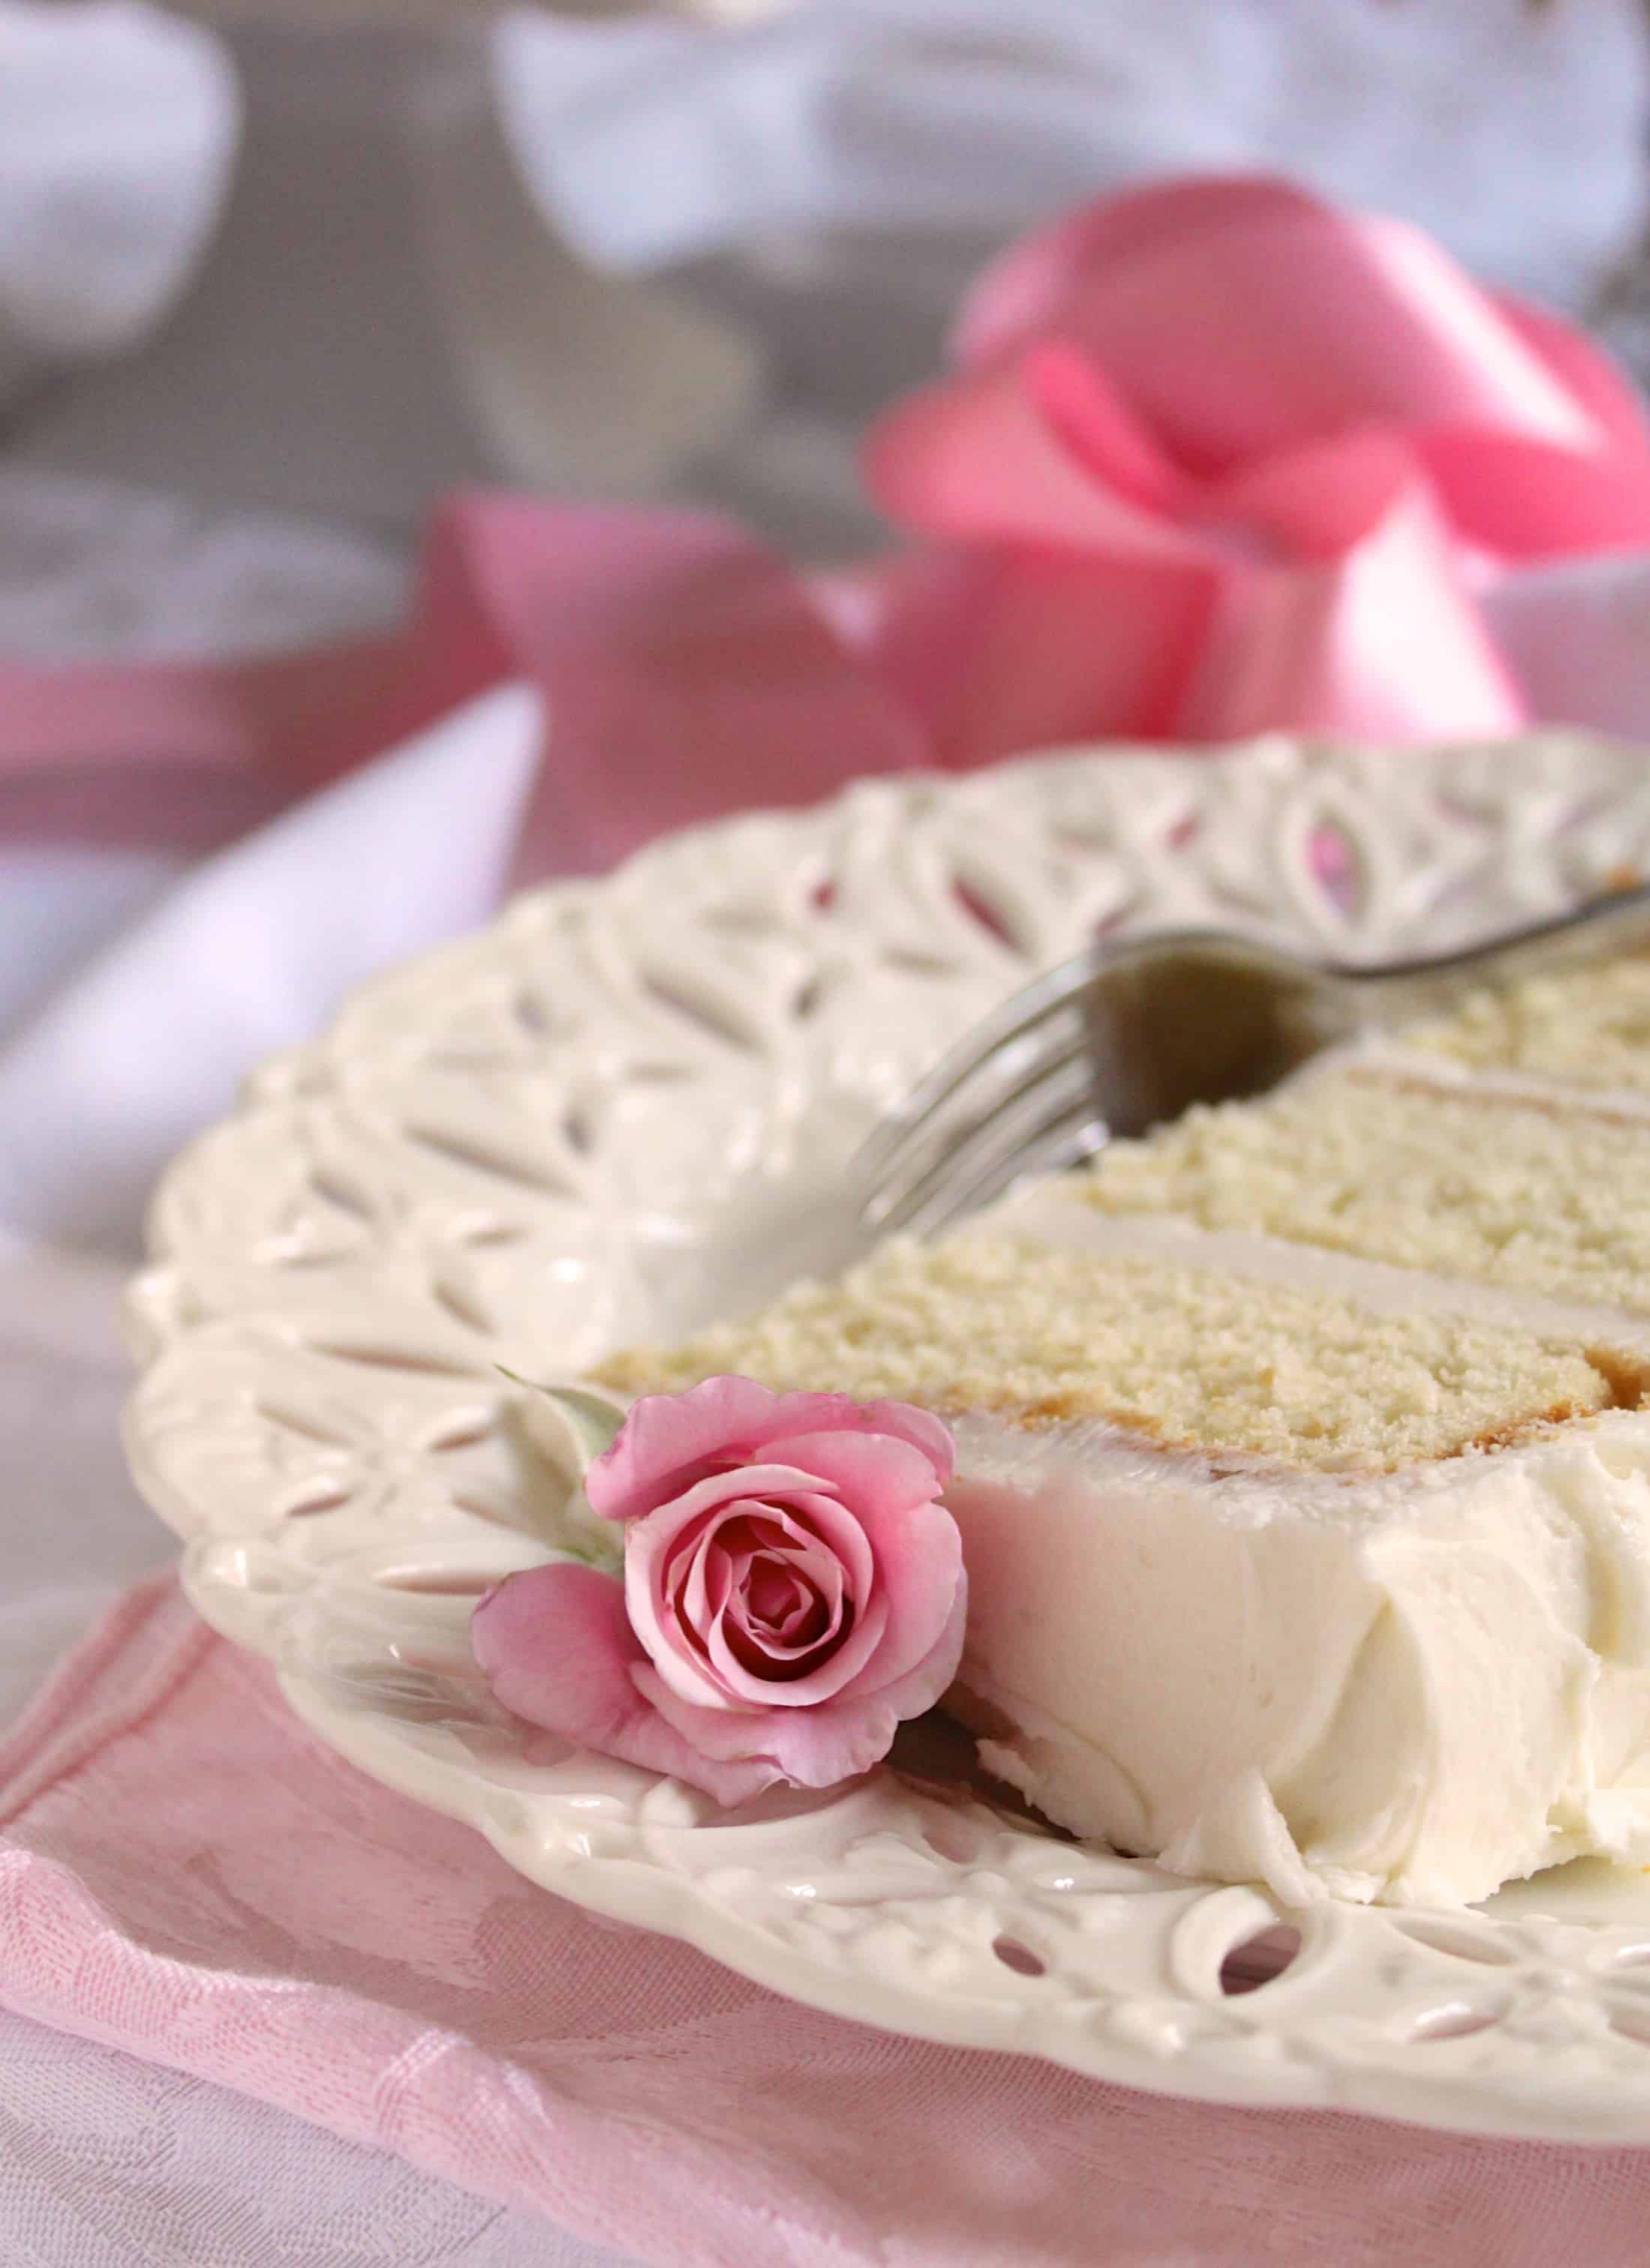
Buttercream Frosting Tutorial
Choose a flavor which will complement the cake. I used chocolate mocha for the chocolate cake, and plain vanilla for the white cake, or you could make vodka buttercream for an adult’s cake. After leveling the cake, fill the middle of the layers with frosting, trying not to get a lot of crumbs into the frosting in the bowl; always pull the frosting from the center, outwards, so that it avoids contact with crumbs.

Next, spread a thin layer over the entire cake, as this is only a “crumb coat”. As you can see, there are some crumbs stuck in the frosting, but this is totally fine when using this method.
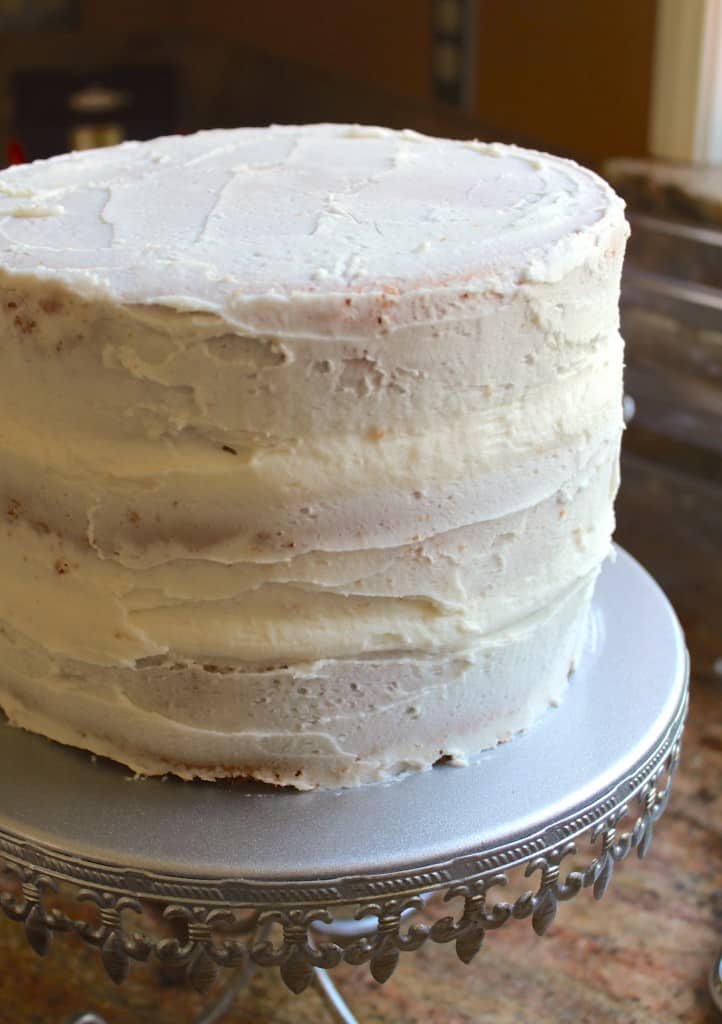
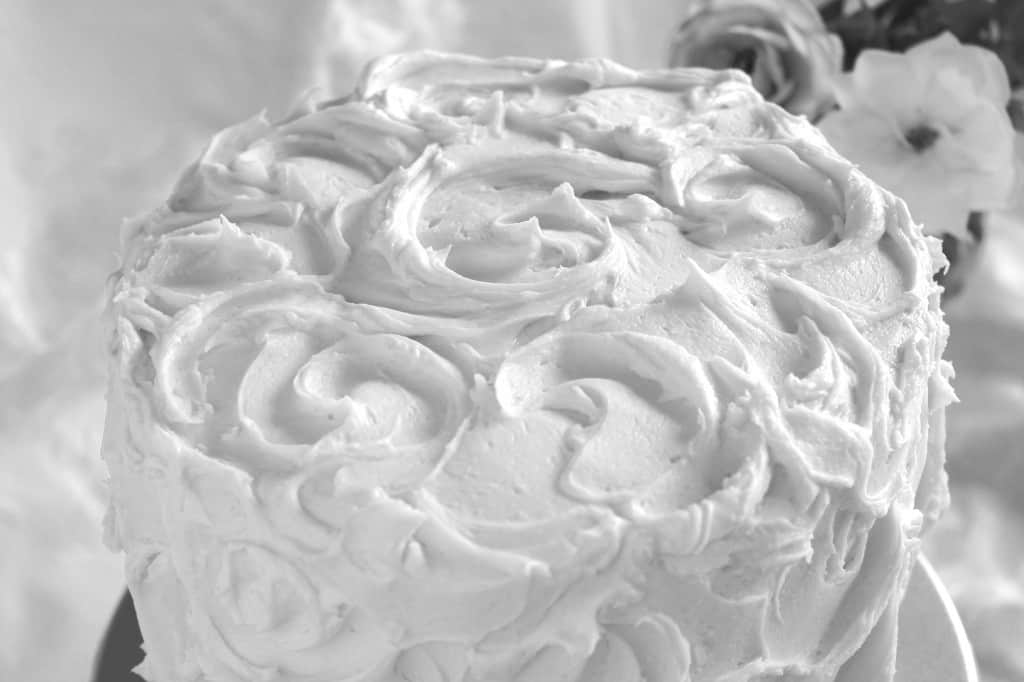
Put the cake in the fridge for about an hour or so, then spread another thicker layer of frosting, and this time, you won’t have to worry about crumbs!
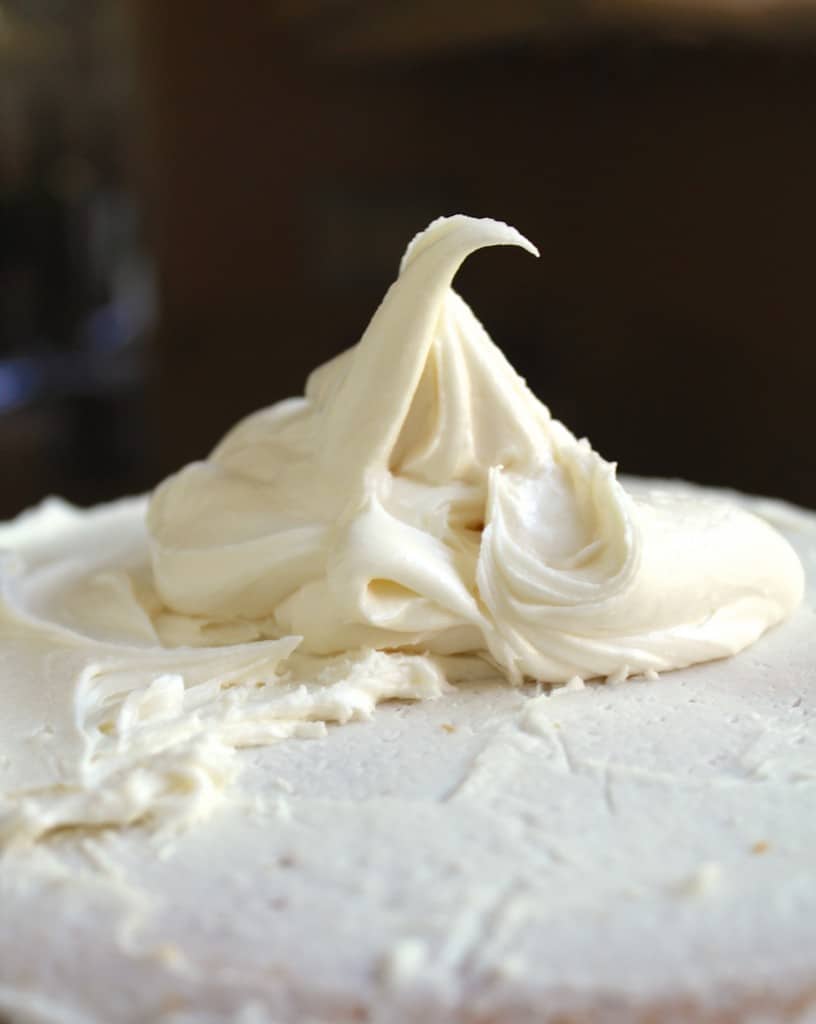
Spread the frosting thick enough, that you can make swirls, or whatever pattern you like. I just used an ordinary butter knife, so no special tool is needed.
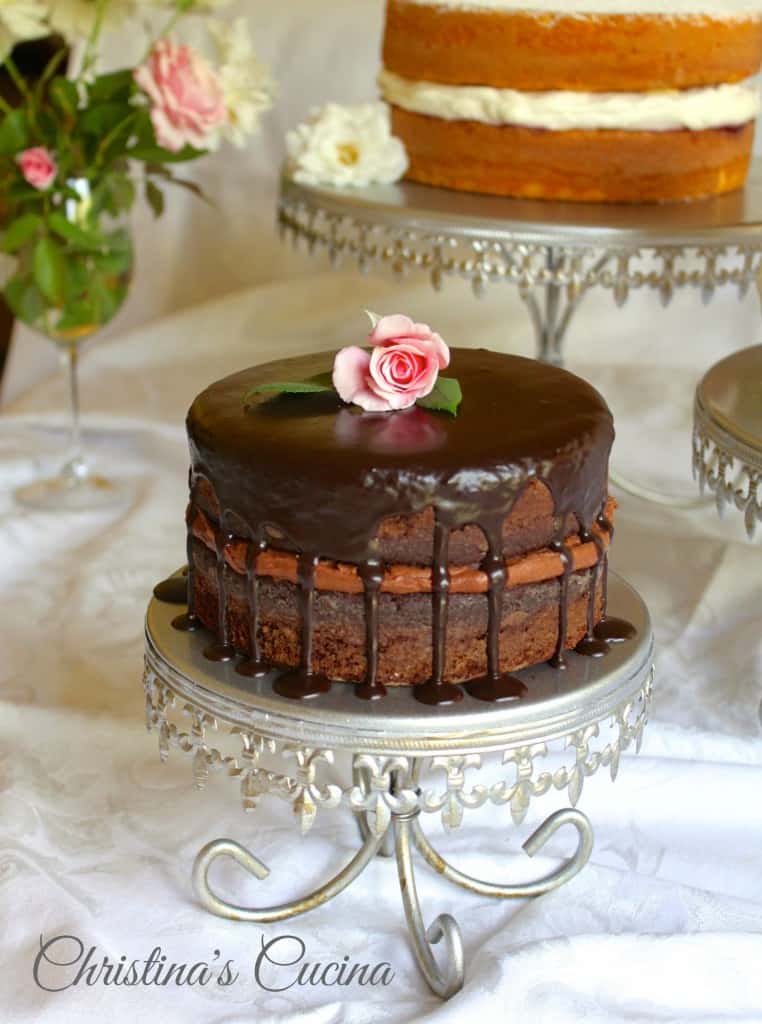
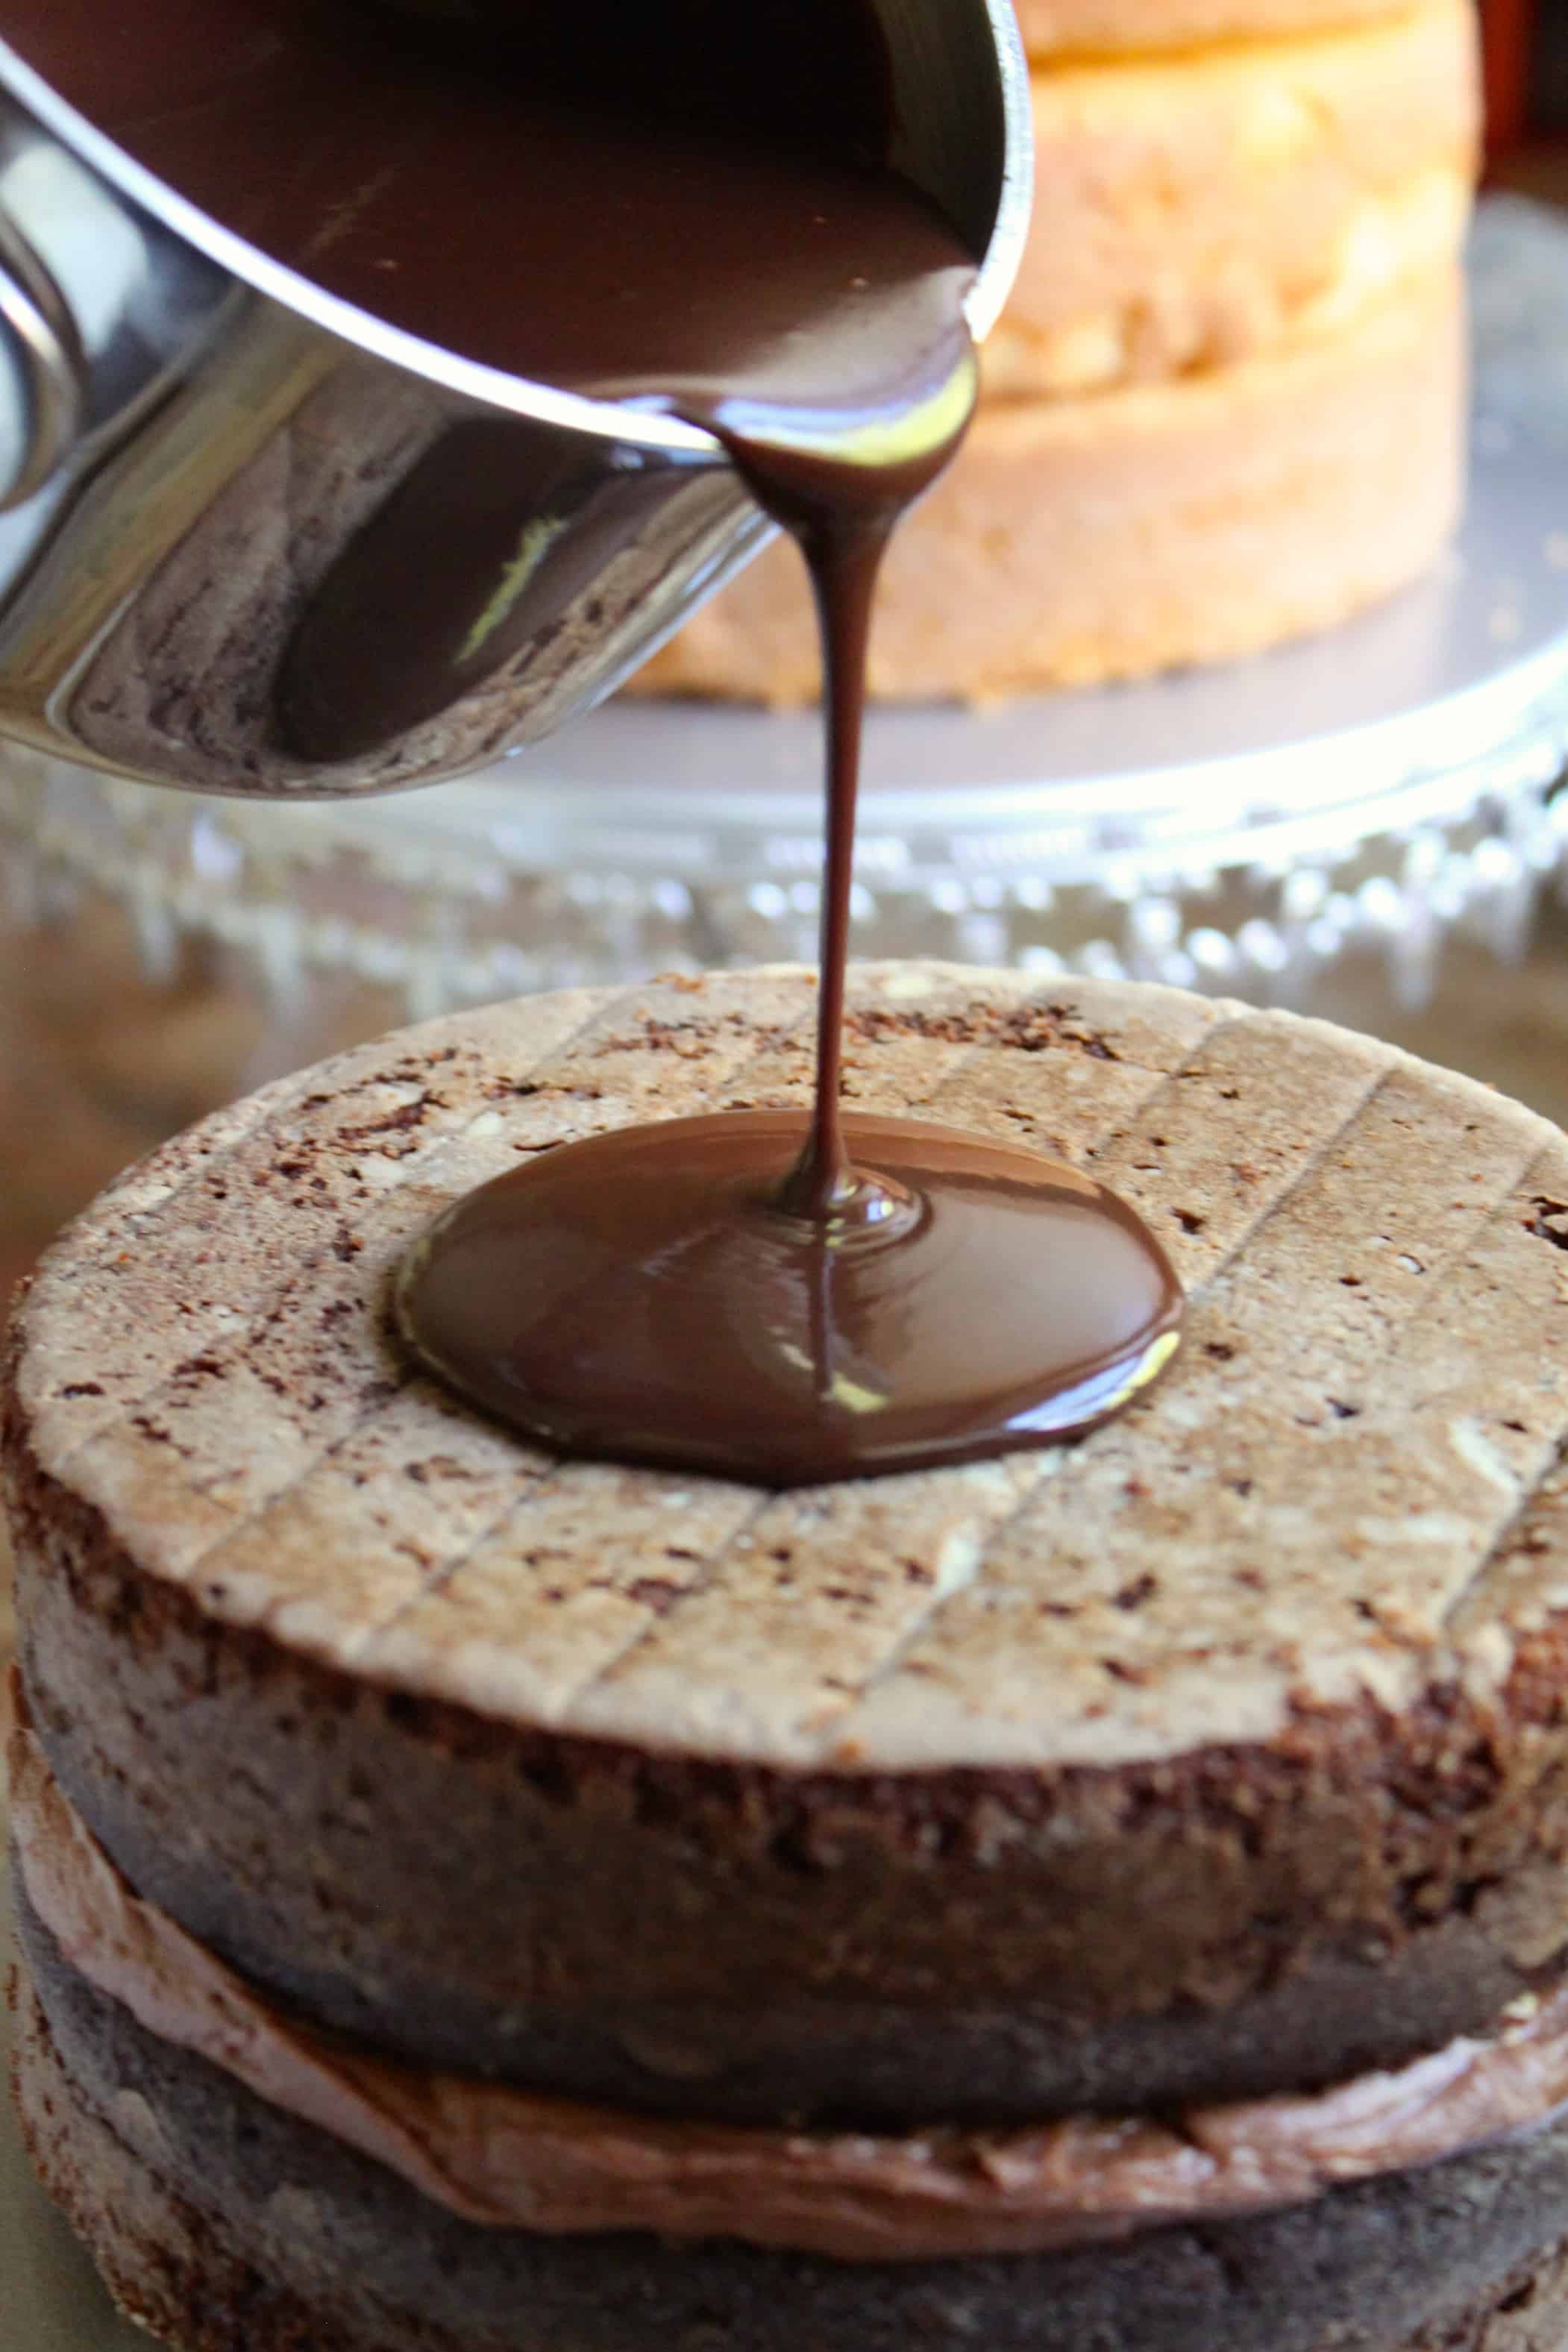
Chocolate Ganache Tutorial
This is one of my very favorite ways to decorate a cake because it looks so difficult, but it’s actually the easiest of all!
Here’s the recipe: EQUAL AMOUNTS OF CHOCOLATE AND CREAM. Yes, that’s all, but be sure to use really good quality chocolate and good quality cream. Put both ingredients in a pot over low heat and stir until you have a smooth, thick sauce. If it gets too hot, it will run over the cake too quickly, so let it cool a little and stir often so it doesn’t get a “skin”.

When it’s the correct consistency (like cold maple syrup), simply pour the ganache, slowly, over the top of the cake.
Let it drip over the edge.
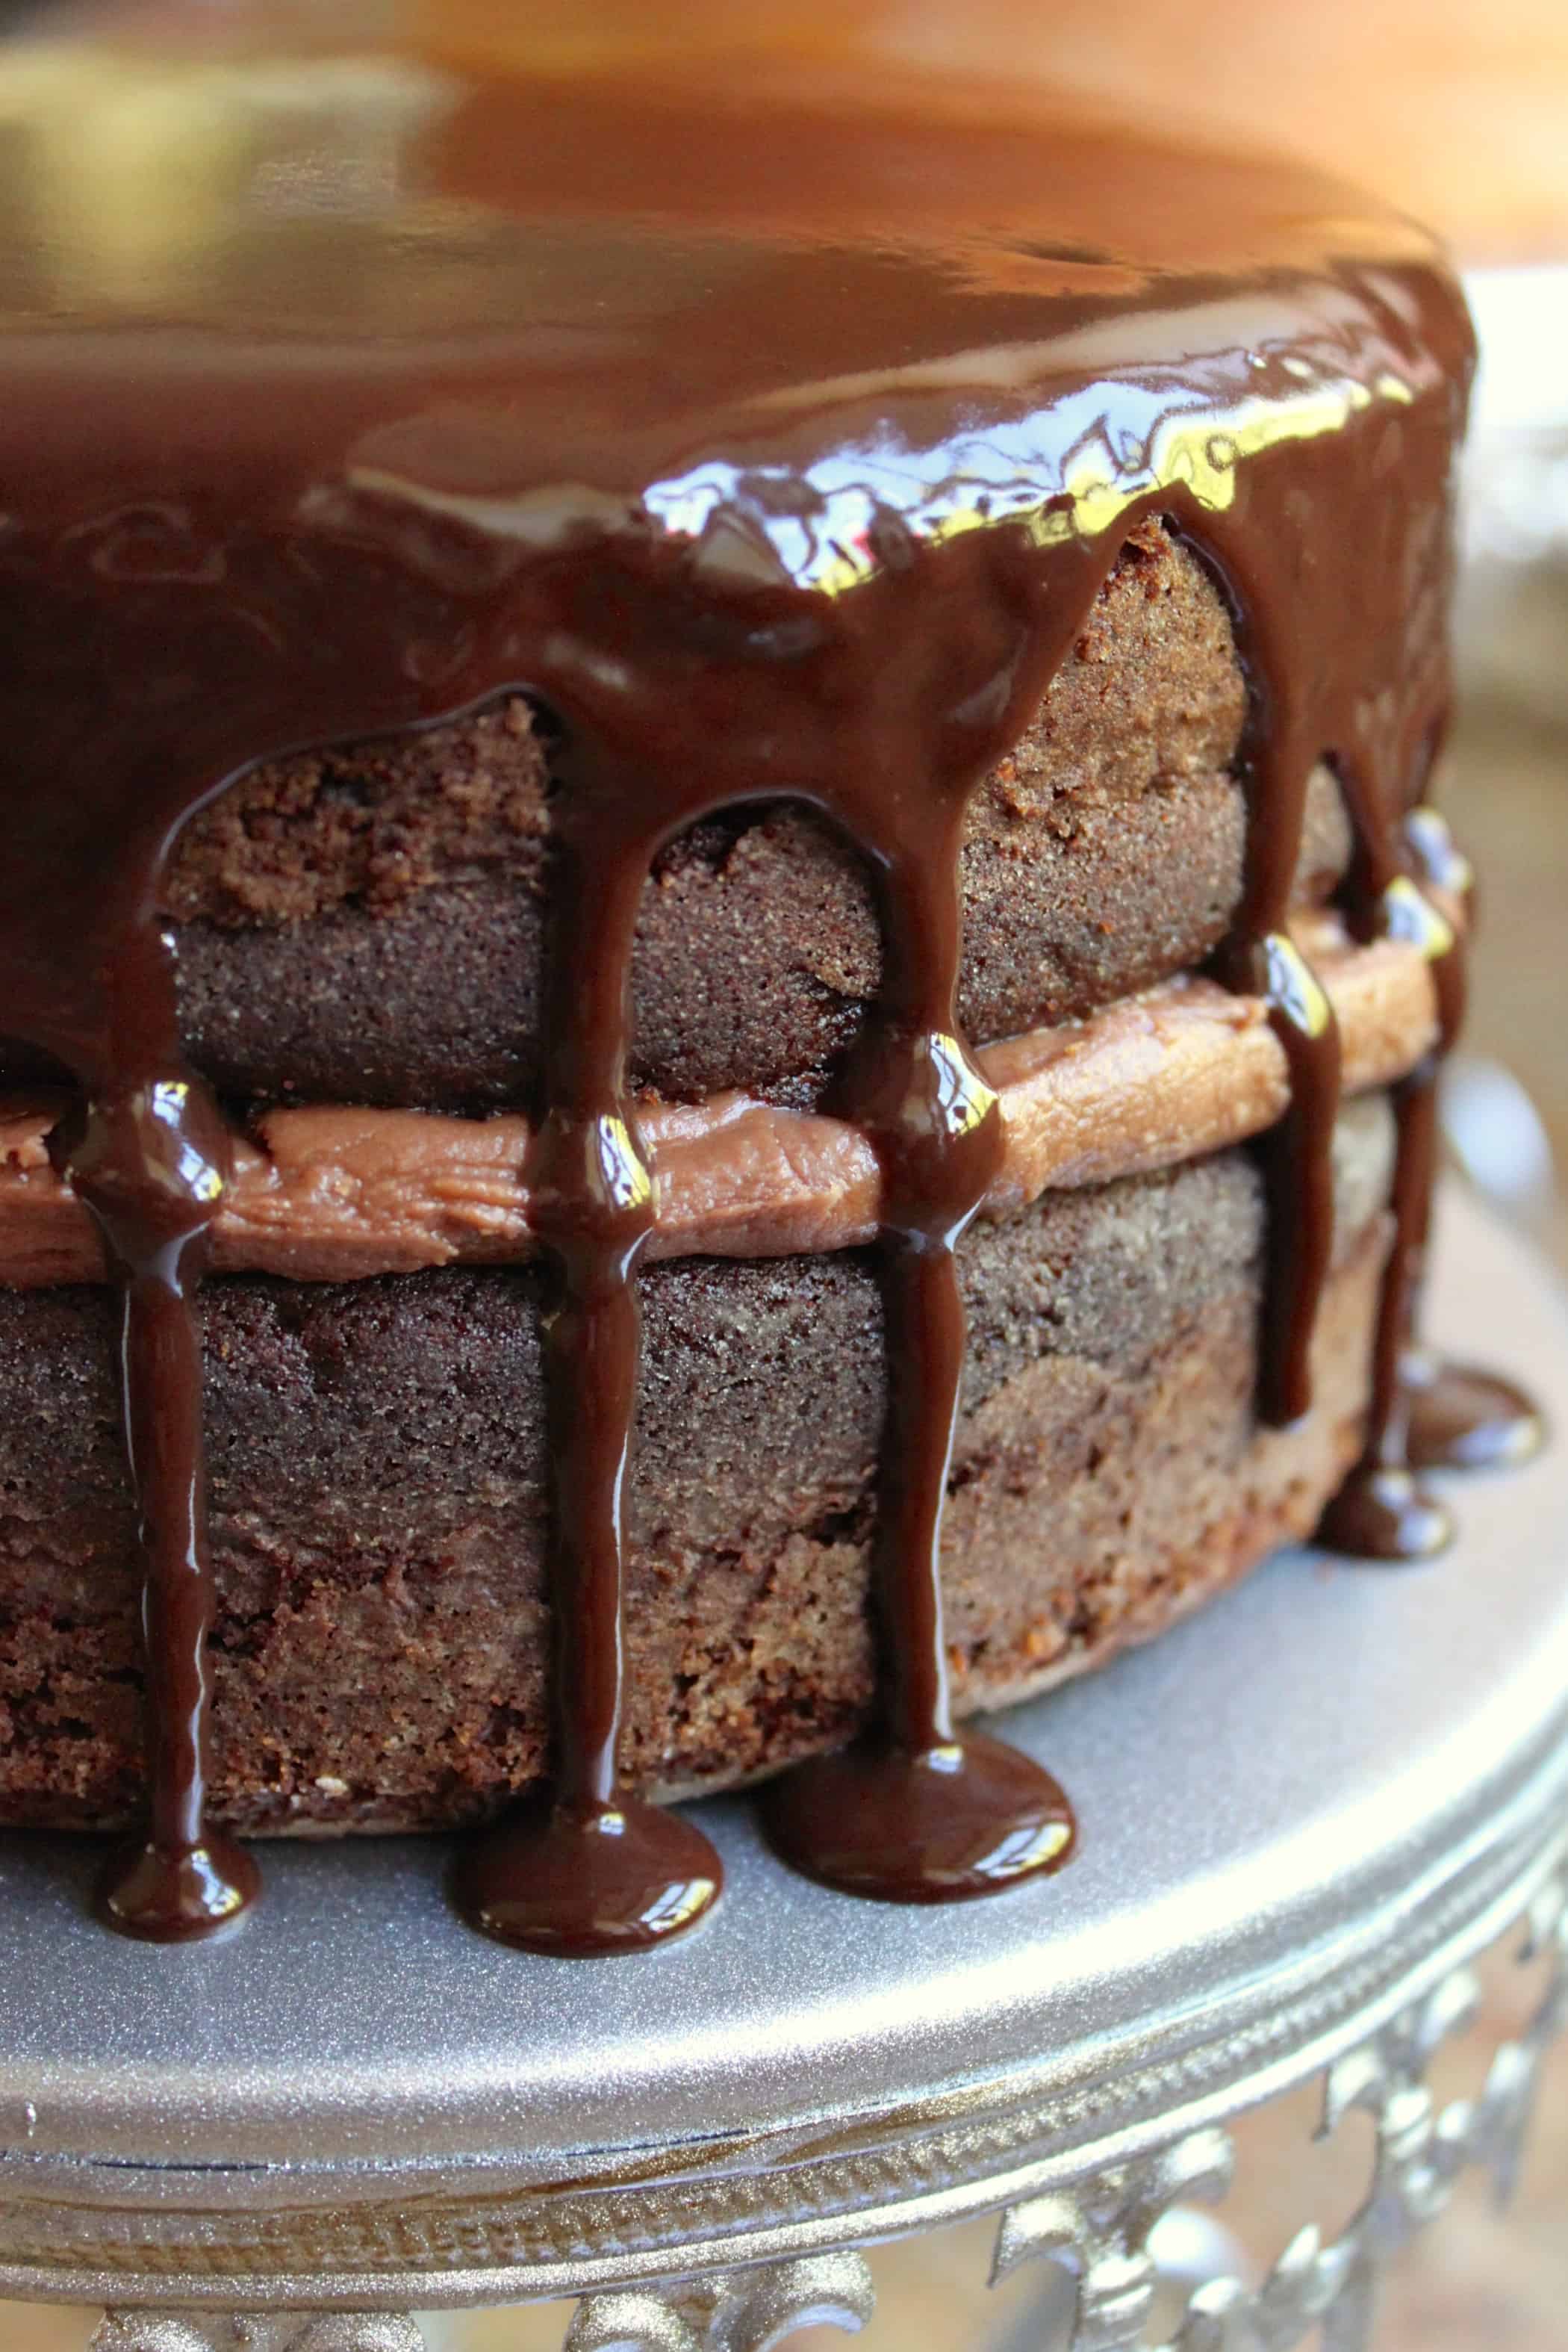
You can also cover all of the sides completely if desired. For this small 6″ cake, I melted 4 oz (1/2 cup) Trader Joe’s chocolate chips with 4 oz (1/2 cup) heavy whipping cream and still had leftover ganache, which is great for dipping fruit into, such as strawberries and bananas.
A Few Other Ideas for Filling and Topping
-flavored whipped cream
-a stiff version of pastry cream
-fruit and whipped cream
–cream cheese frosting
-chunky filling, like a sweet coconut as used in German chocolate cakes
-plain powdered sugar dusting (only for top)
-fruit glaze like on this orange cake
STEP 3. Garnish and decorate. Here are some examples:
Powdered/Confectioner’s Sugar
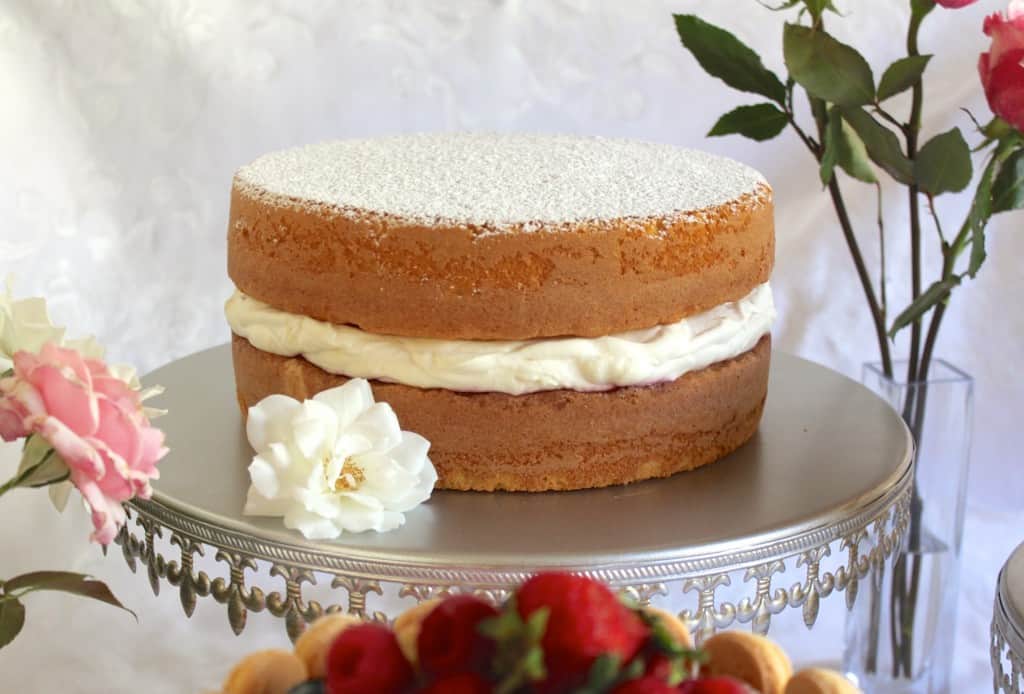
Never underestimate the power of powdered/confectioner’s sugar. This cake decorating tutorial would be amiss in not including powdered sugar! A little sprinkling on almost any dessert or baked good just makes it say, “I’m just so much better now!” like on this semla.

Not to mention its other super-power of being the best “cover up”, hiding mistakes and blemishes in the most opportune way! If you don’t have powdered sugar, you can also use granulated sugar as is often done on sponge cakes in the UK.
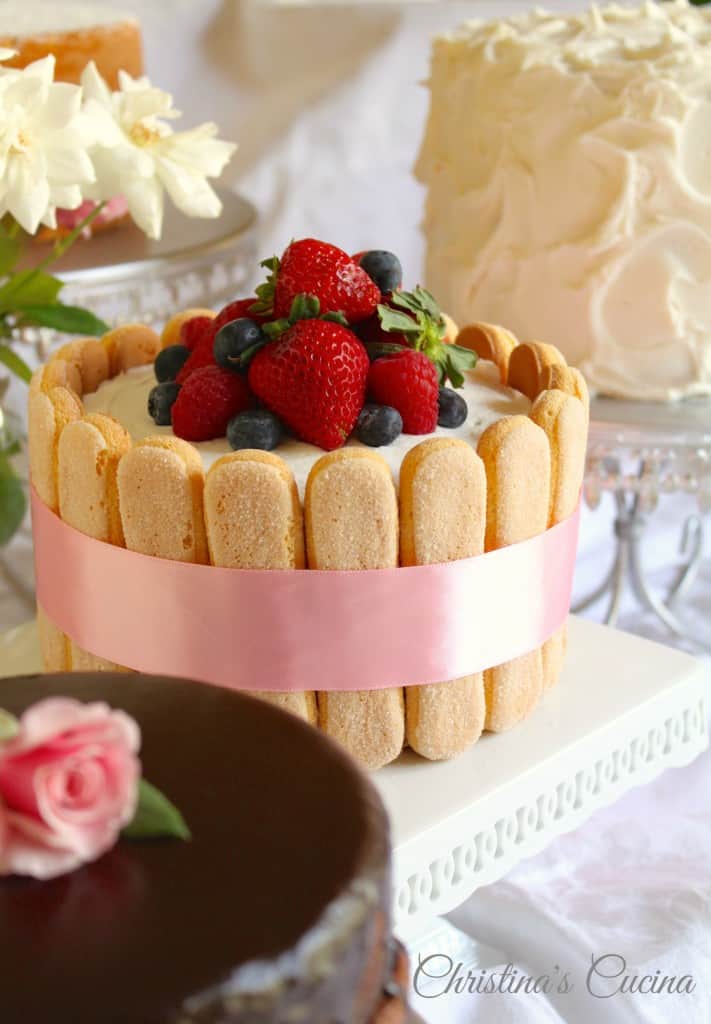
Biscuits, Cookies, Wafers Etc.
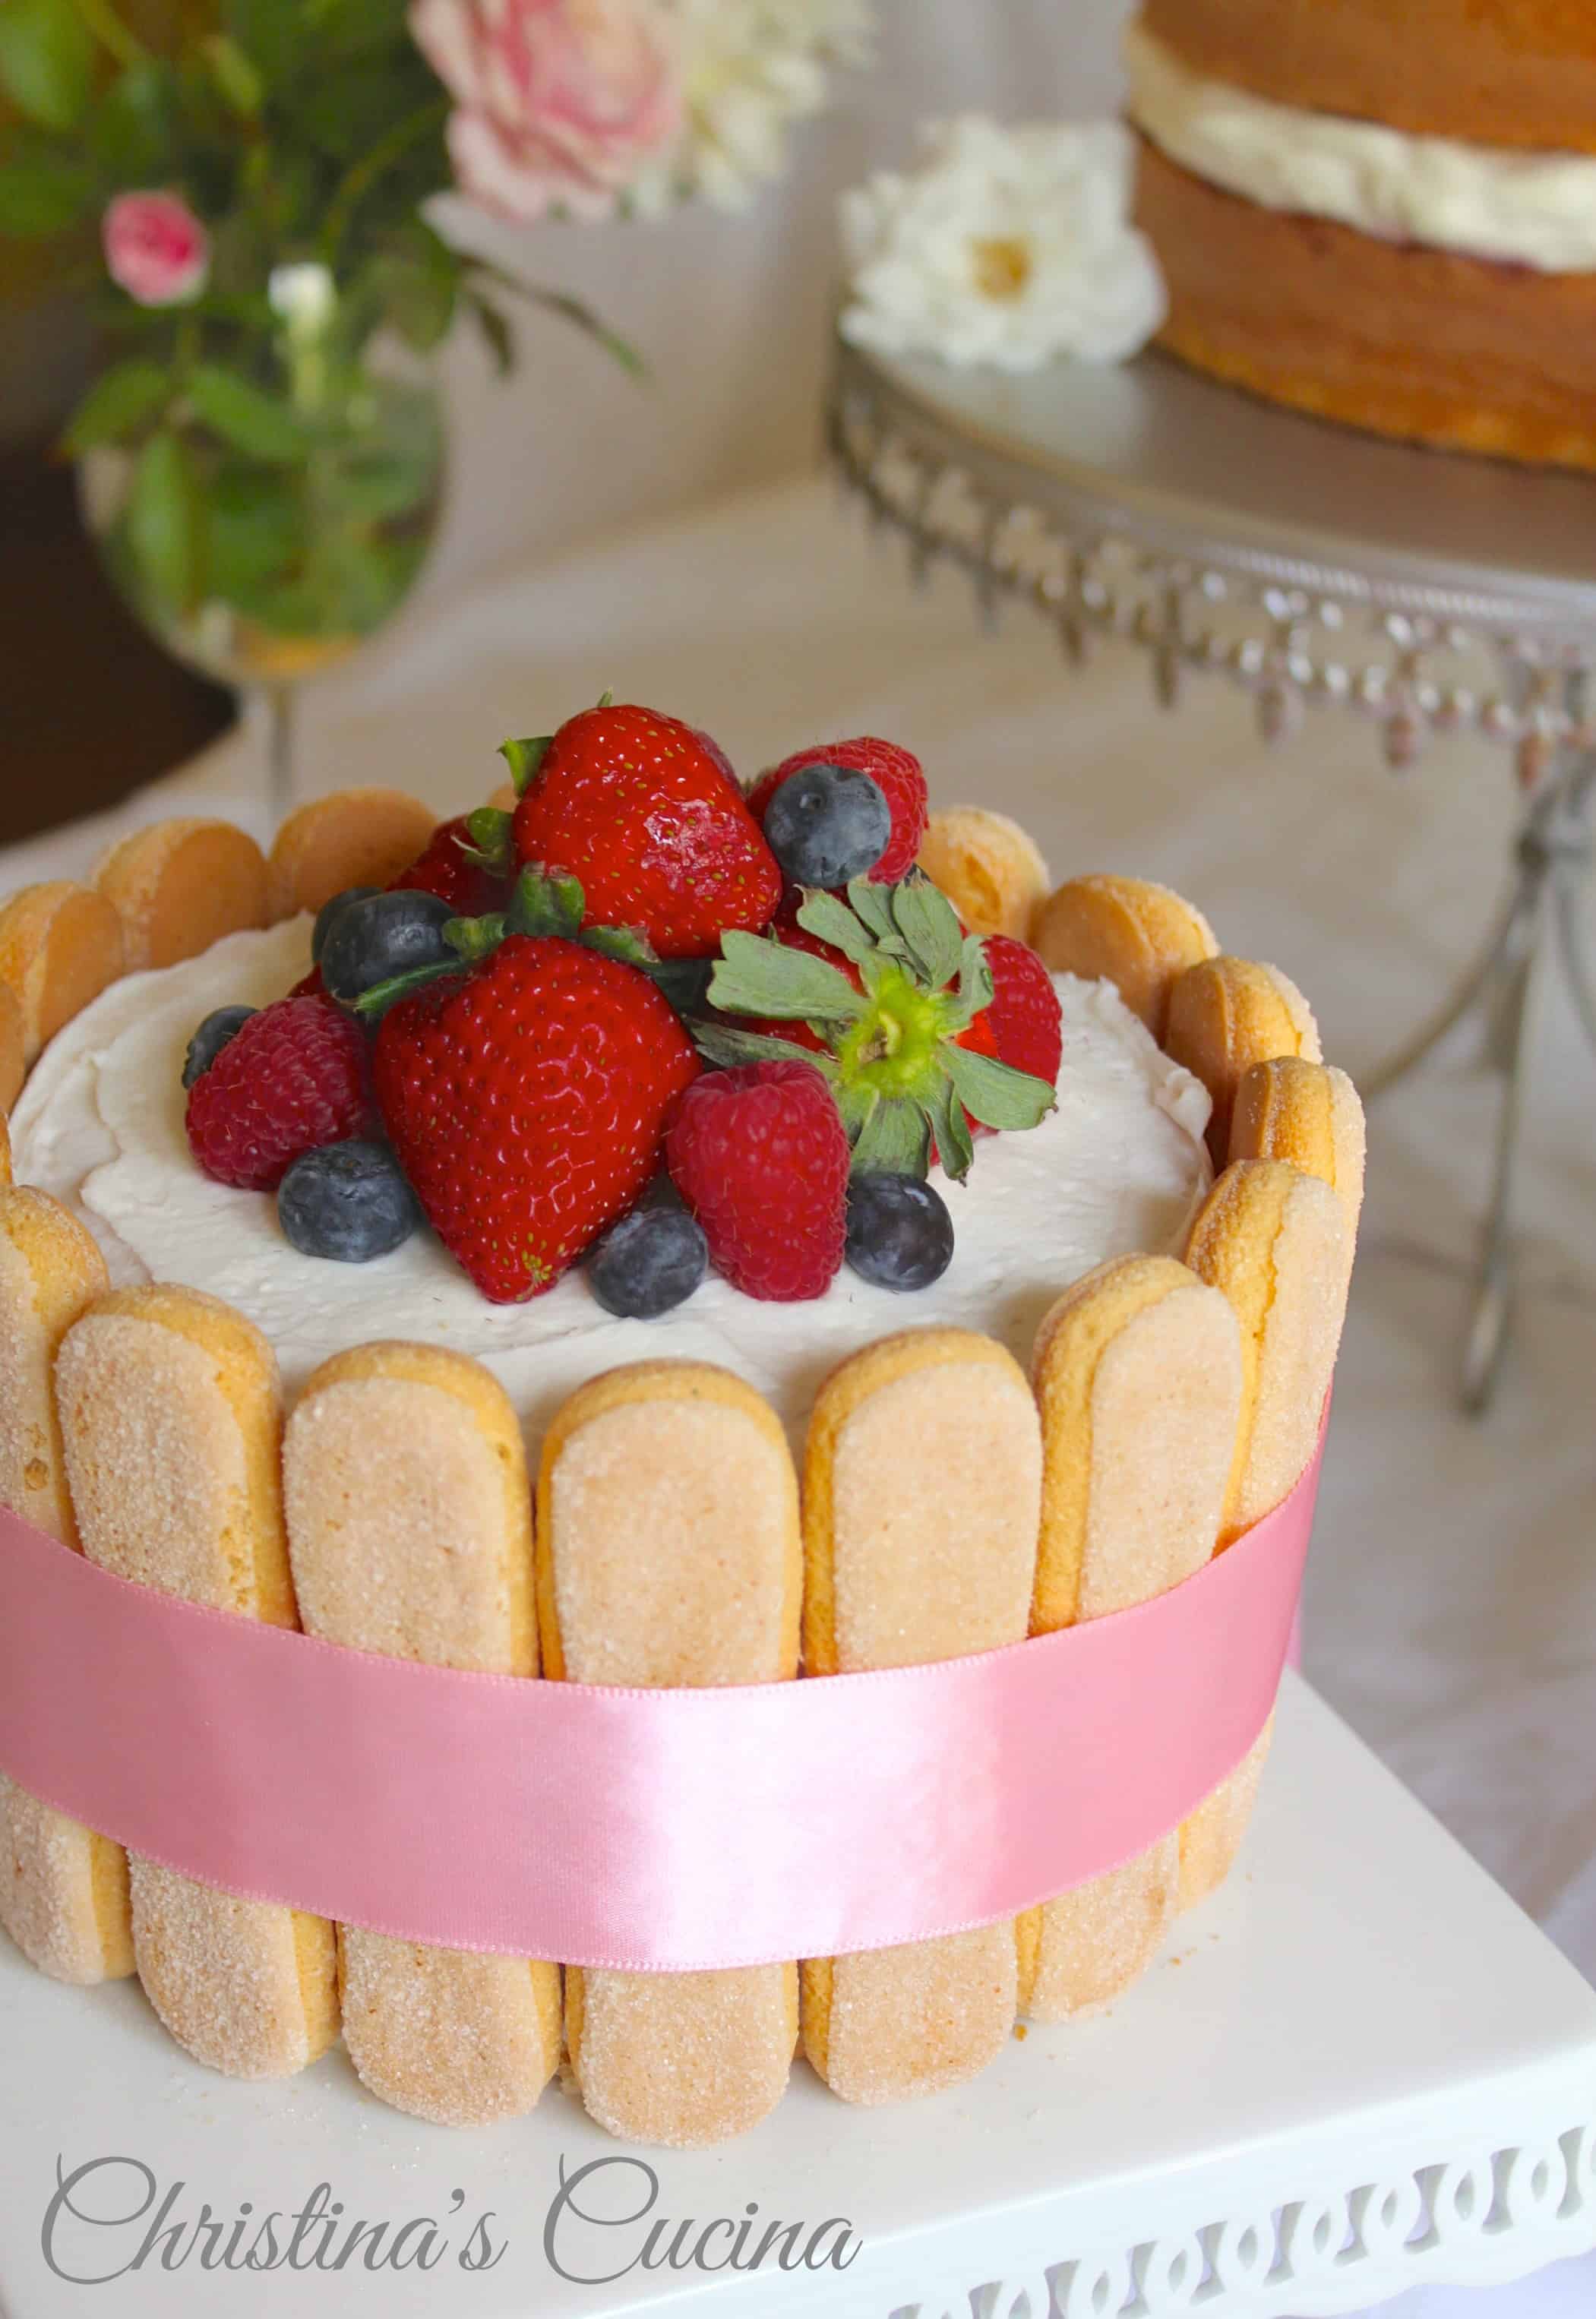
If you’d like to make the cake in the photos which is lined with ladyfingers, either Savoiardi or the French style, all you need to do is press them on while the buttercream is still soft. If it dries, a little smear of buttercream is all you need to make them stick.

Tying a ribbon around the cakes isn’t necessary, however it’s nice to know that none of the ladyfingers can fall off, and I think it just looks lovely, as you can see in the photo below. I used Italian ladyfingers, but you can use soft ladyfingers (French) or any type of cookie or biscuit which can line the perimeter of the cake; pirouette cookies are another great choice.
Use a ribbon to tie in a theme: a blue ribbon for a baby shower for a boy, and blue pacifier decorations for the top, makes a gorgeous centerpiece for the buffet table.
Fresh Fruit as Easy Cake Decorating Ideas
Such as strawberries, raspberries, blueberries, grapes, cherries, etc., any fruit that won’t turn brown, and as you can see, even just three strawberries are enough to dress up a cake.
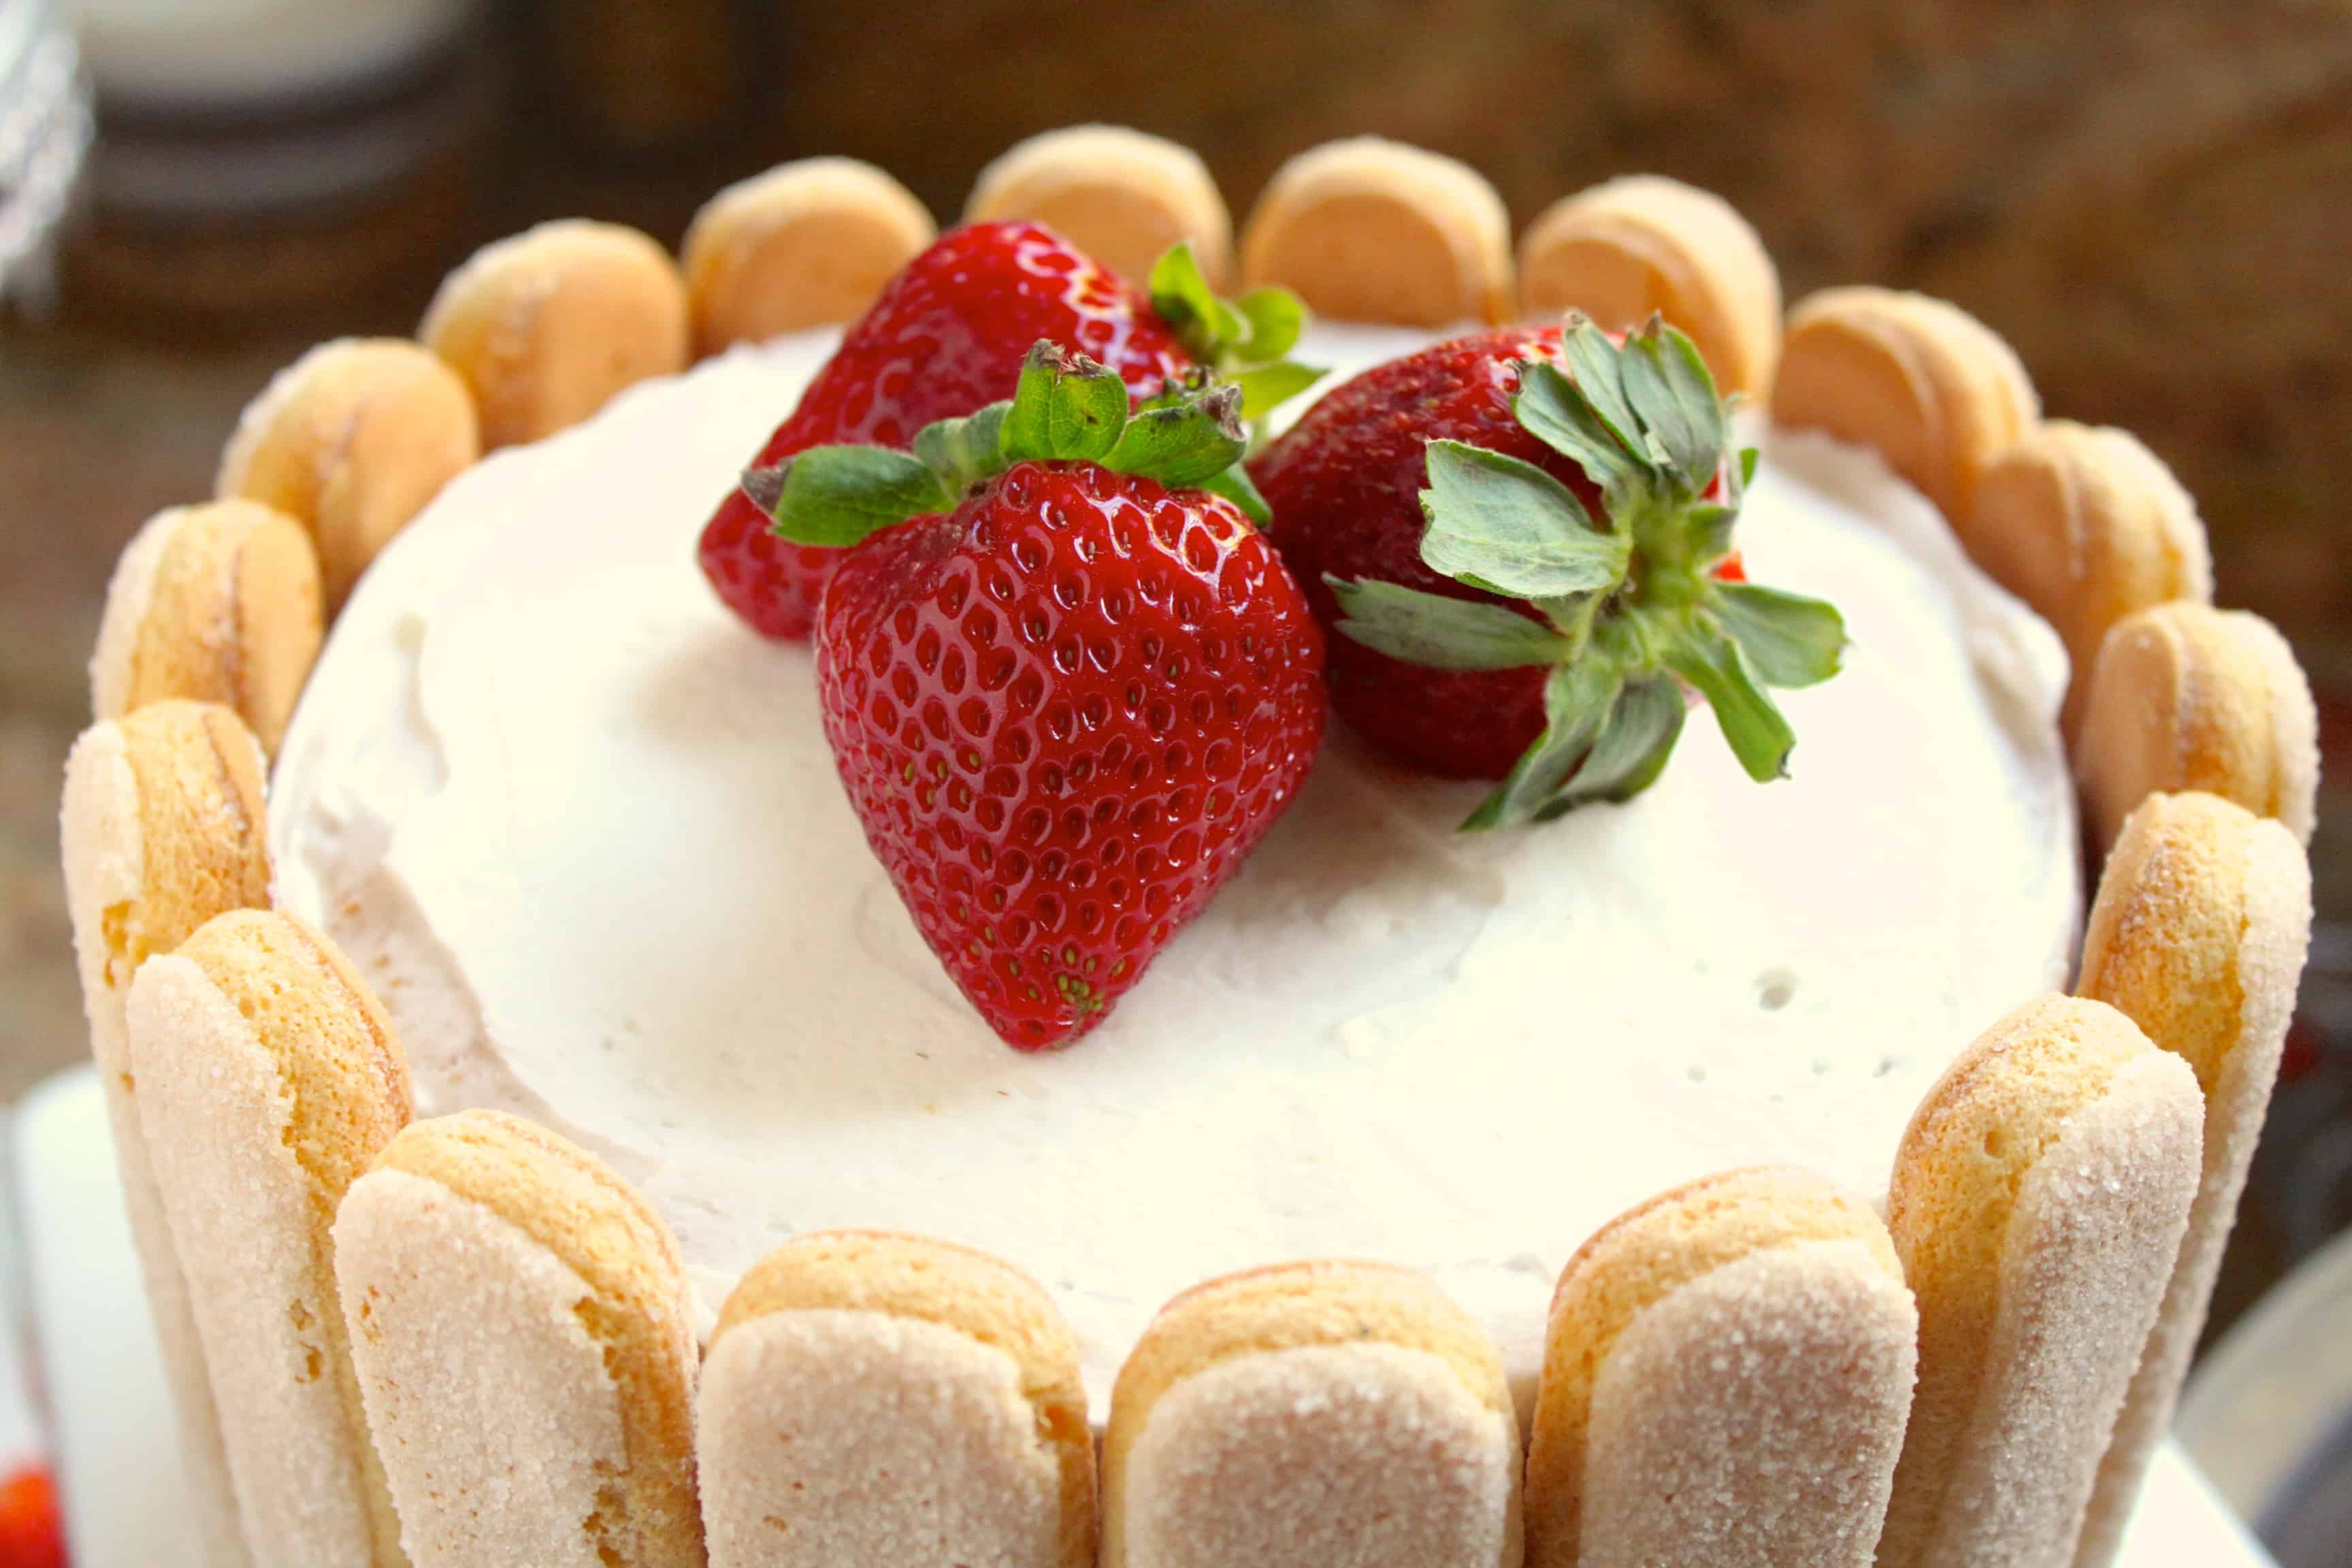
However, a few more differently colored berries, makes a big difference.
Fresh, Edible Flowers
I love using fresh flowers, especially roses on cakes! How can you beat Mother Nature’s work? It makes the cake look classy and elegant, but it’s so easy; just place it (them) on top or on the side! However, just make sure not to use anything poisonous, such as oleander flowers; please use Google if in doubt. Roses, violets, nasturtiums, strawberry and chive blossoms are all edible.

Stands and plates
As you can see from the photos, I’ve used pretty cake stands. Nothing looks worse than a paper plate under a cake. Use the cake plates to your advantage; there are some really pretty ones available now.
Other Easy Cake Decorating Ideas
-sprinkles, but unless it’s a children’s cake, I’d advise holding off on the rainbow kind (just my opinion, btw)
-candies, jelly beans, brittle, crushed candy bars, sugar flowers, purchased decorations like these roses, for example
-plastic decorations (remove prior to cutting, especially if children are present)
So as you can see, it’s not that difficult to get professional looking results by using this cake decorating tutorial! And when you want to start with the piping bag, it’s even more fun! Here’s a simple starter kit.

If you have any questions, please feel free to email me or leave me a message below. I hope you’ll try my tips!
Don’t miss another recipe or travel post; sign up for my free subscription at the top.
Here are two cake recipes for you to use.

Christina’s Cucina is a participant in the Amazon Services LLC Associates Program, an affiliate advertising program designed to provide a means for sites to earn advertising fees by advertising and linking to Amazon.com.
cake decorating tutorial
sor em ver dar água na boca cada um com charme muito especial amei
Obrigada!